When I try to explain to clients that I shoot in RAW format so that I can have total control over the editing and processing of an image, most of the time, I'm met with blank stares. Sometimes a picture is worth a thousand words.
Ever been in the right place at the wrong time? As a travel photographer, that scenario happens on a regular basis. Sometimes, I'm on a busy schedule and can't linger another 45 minutes to catch the right angle of the sun, or wait for that big rain cloud to move away. But I just
know that the shot I want to capture will be cherry with just a little more sun glow and darker, richer shadows.
Wait for the light or create the light?
What makes me different than other photographers is that I see the completed "picture" in my mind's eye, even in less than perfect conditions. I shoot the scene "as is", knowing that I will take that image into my digital darkroom and develop it to meet my vision of what the scene should look like, or -- with a little imagination --
could look like. Is that cheating? Not at all! It's similar to layering stacks of filters on a camera like the photographers did in the film days and tweaking the development in the darkroom. But now, in the age of digital, we can go even farther in our image processing, commonly referred to as "post- processing".
In the post-processing stage of photography, the typical photographer may adjust the contrast or sharpen the details of the photo, maybe even touch up a zit or two. Perfectly acceptable. However, what sets my style of photography apart from other, even more experienced, photographers, is a high emphasis on post-processing and creating special effects to a otherwise "not so special" photograph.
 |
| AFTER |
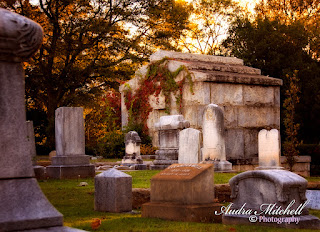
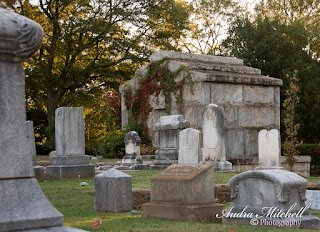
The photo to the left was taken in Oakland Cemetery in the late afternoon, just shy of "golden hour". I was with a photography group and had wandered off to take a few photos before the shoot began and had to get back to the group for the start of the shoot. I saw the mausoleum and almost didn't photograph it, because it wasn't quite what I was looking for. After reflection, I decided it had enough "bones" to work with in Photoshop and build the type of effect that I was looking for.
 |
| BEFORE |
I gave the photo a low key lighting effect, changed the light blending mode, boosted up the reds, and brought in a dark glow to give the photo an air of eeriness, appropriate for a cemetery. Lastly I brought down the darkness of the corners and edges to draw the viewer's eye toward the mausoleum as the key focal point in the photo. This final effect is what I saw in my mind's eye and is why I decided to snap this photo.
I rarely show a client the pictures in my camera at the shoot. Firstly, it takes away from our shoot time, and often times, clients can obsess about looking through the 3.5 inch viewfinder of my camera, worrying about this or that being too light, their thighs appearing too large, or a myriad of other distractions. Secondly, I know what I am looking for as a photographer, and I know from experience what is a workable photo when I review it in the camera while taking the shots. Often times, I may have limited lighting equipment or space to work with, so I shoot the scene with good exposure knowing that I will add the appropriate lighting that lines up with my vision in the post-processing stage.
 |
| BEFORE |
Have you ever watched a movie being filmed and are surprised at how brightly lit or lackluster the ambiance is? It looks as if it's being filmed as a daytime soap with no character or personality. Later, when you actually see the movie in the theater, it is bursting with color and rich, deep shadows with a delicious atmosphere. This process is known as "grading the light" in the movie industry. The filmmaker actually applies the lighting effects on a separate layer of the film and can add or detract the effect per his vision. This is the same technique that I apply in my post-process editing stage.
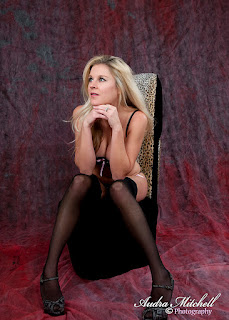
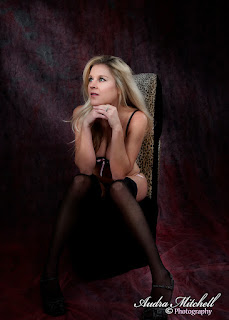
Look at the photo on the right in the "before" stage. It is a well-exposed image that just lacks atmosphere and interest. It is a lovely pose, but maybe not a "seller" for me. When I shot this photo, I told my client to look wistfully up, as if you are looking toward an open window. I had the idea of making this shot dark and shadowy with the effect of a few light rays cutting in through a window, dappling the subject in light.
 |
| AFTER |
In the final image to the left, I added a dark shadowy layer to the photo and just erased part of it with a brush with varying levels of size and opacity to give the effect of light rays cutting through a smoky, dark room. Va-va-vavoom, right?! Now we have a photo that matches my vision and is much more appealing to the client.
Now, we have a work of art.


 I am offering a special Mother's Day promotion portrait session for $50 an hour. You choose how long the session lasts (one hour minimum).


 The goal of boudoir or glamour photography is to portray the lady at her most beautiful and sexy self in a manner which flatters her best features and projects mystique and romance. While I think the human body is beautiful in its nude form, for artistic reasons, I never photograph nudes or even partially nudity. I believe more mystery and anticipation can be created with just hints of nudity rather than full exposure. All of my models remain fully covered, even if they appear to be nude under a throw or a pile of feathers.
 The boudoir/glamour mood is created with lots of soft, flattering light in the studio and a good bit of post image processing in the computer. The goal of this type of photography is not photo realism, but to achieve a Hollywood-style glamour with a bit of fantasy (without the plastic surgery). Typically skin is softened and any blemishes or other imperfections are removed or reduced, depending on the client's preference. I tend not to totally remove wrinkles, but to reduce them to where she still retains the character, but age lines are not a focus or distraction in the final photograph. I want my client to look like "them", but a slightly refreshed, more perfected "them". My editing techniques also includes reducing double chins, de-plumping cheeks, and the ever-popular digital liposuction. All of my results are believable and natural looking. I am realistic and upfront when booking a boudoir session. I tell my clients I cannot give them the body of a supermodel, but I can trim down unwanted bulges and whittle middles and trim thighs for a more appealing body line. Which brings me to an often unexpressed question: "Is boudoir for me?"